April 19, 2010

He Gave Up His Video Games for Me!

Well, not completely.  I don't think Mr. Doxie could ever give up video games, and that's okay.  I enjoy them too.  However, he did trade in a substantial amount of his games to Amazon.com for credit there.  We had planned on doing this a few months ago.  He was going to trade in everything that he no longer played, and buy the new games that he wanted.  Well, we finally sent them in and he got the credit today.  34 games landed us just under $300.00.  It's a loss, yes, but not too bad if you consider they were just sitting on the shelf!

After a bit of light persuasion on my part, Mr. D agreed that it would be okay to see if Amazon sold anything we might need for the wedding.  We still need a lot, and luckily Amazon sells everything!  Our video game shelf is a little barer, but we definitely scored:

We finally got our rings!

This is mine                                       This is Mr. Doxie's.

The groomsmen got their ties:
I think these mint ties will go well with the bridesmaid dresses.

Mr Doxie got his tie:

Finding a red and aqua tie was hard!  Hopefully we like this one when it arrives.
And we got a buttload of candles!  144 votives and a dozen pillar candles.  We'll need many more pillars, but I wanted to see the quality first.

Not too shabby!  I am so appreciative that Mr. Doxie was willing to give up his beloved games to help pull our wedding together.  Also, we get to cross a bunch of things off our list with no out of pocket costs.  Score!

Did you and your FI do any "spring cleaning," so to speak, in order to purchase things for your wedding?


P.S.  My dress was delivered today!  It's currently sitting in my living room waiting for me to get home and open it.  I'm so excited!  Pictures will come soon  : )


April 9, 2010

The Doxie Invites: The Big Reveal

I was planning on splitting the invitation reveal up into multiple posts, hence my previous two, but with just over a month left to the wedding I just don't have time.  I'm a huge ball of stress because I have so many things left to do.  Blogging gets pushed to my lunch hours at work, and most of the time I forget to upload my photos.  Anyway, here goes nothing.  I'll keep the commentary to a minimum  : )


Presenting our invitations, which were truly a labor of love frustration.
I didn't feel like editing the pictures for privacy.  Oh wells, don't stalk me guys, k?  The tags were somewhat of an afterthought.  I cut them out with my Cricut and gocco'd the design on the front.


On the back, they served as an inner-envelope so-to-speak.  I wrote the names of everyone invited.  I'm really not sure if anyone even noticed this.


Yummy baker's twine and our fabric-backed invite peeking through the heart.


Cutting, folding, gluing and gocco'ing these sleeves was a major pain in the butt.  But I guuesss it was worth it.


Our invitation, out of its home in its sleeve.  The original plan was to use Lettra paper and gocco everything on them.  That got nixed after the sleeves.  Waaay too much work.  I went with Gmund Digital in white linen purchased here.  It's 110lb and really nice.  And!  They printed perfectly on my home printer.  Sorry Lettra, you're beautiful buy convenience wins.


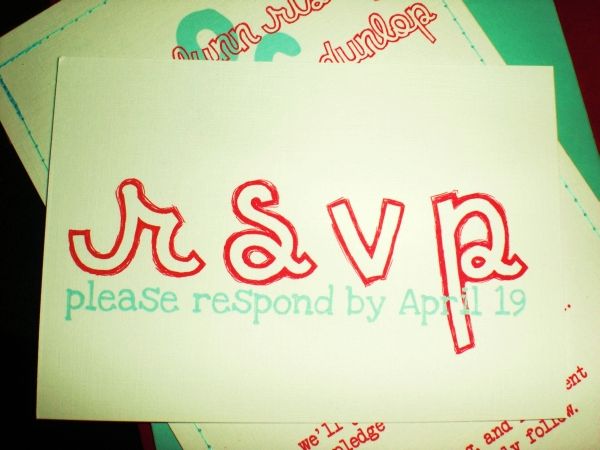
We went with a postcard for our response cards to save postage and trees.  Same deal with these, used Gmund paper and sent them through the printer.


USPS really needs to update their current stamp collection.  Polar bear?  Really?  Well, at least it matches!
On a side note, it's surprising (and a little sad) how few people are leaving us notes.


And because we're already receiving gifts, I started to make our thank you cards.  They're super easy to make and look pretty awesome.

The back of our thank yous.  These are gonna go in pool (the same color as our sleeves) envelopes and be hand addressed in red ink.

So there they are!  I love them, and I've had a ton of compliments, but they were a pain to make.  
Folding 120 sleeves hurt my fingers.


Sewing 120 invitations and labels took foreeeever.

Don't forget about the tags and gocco'ing.  It was seriously a chore.  On top of that, my dad kept calling to add invitees.  To be honest, my favorite part of making my own invitations was putting them in the mail slot.

If there's one thing I learned from making our invitations, it's that they can't be perfect.  
I kept making small mistakes (like the over-stitch above) and getting frustrated.  I'd throw it in a separate pile and think to myself, "Well, I guess I can give that one to my Grandma."  (She's blind.)  Or, "Urghhh.  I don't think Mr. Doxie's brother will notice this..."

But in the end, I don't know who ended up with my faulty invites.  And I really don't care.  They're done, they're cute, they're somewhat original.  That's the best I could do!

Hope you like them, Hive!

Are you making/did you make your own invitations?  If you could do it over, would you go the same route?

April 2, 2010

The Doxie Invites: From the Outside In

From day one, making the invitations was the part I was most excited about in all of wedding planning.  I must have designed 15 different invitation suites before I decided on a design, and even still I questioned myself.  When there's an endless amount of amazing wedding invitations on the internet, it was hard to believe that anything I could make would live up to my inspiration.  

Anyway, after about eight months of designing, second guessing and redesigning, I came up with a design that I think conveys the feeling of our wedding and our personalities pretty well.  They're not perfect, and if I had more time I would have added a few more details, but they are what they are, and I think the turned out well enough!

So let's begin with the outside and work our way in.  That's how our guests will experience them, after all!

I knew that I wanted our invitations and STDs to "go" together without being too matchy-matchy.  One of the ways I did this was by using the same color red envelopes from Paper Source.  I know Paper Source isn't the most budget friendly option, but the paper they use on their envelopes is so thick, and the red is so perfect.  

As far as postage goes, I wish custom stamps from Zazzle.com were in our budget, but they simply weren't.  I had already spent more than I wanted on the paper and envelopes!  We lucked out, though, because the King and Queen of Hearts love stamps are pretty perfect.  They almost match, and the overall feeling is very similar to our invites.  We had to use two per invite because USPS told us they were non-machinable.  

Unfortunately, the Canadians didn't get cute stamps.  Postage was a dollar to Canada, and the only dollar stamps available were these Wisdom stamps.  Yeah, they're ugly.  But at that point I didn't care.  I also had to add those airmail stickers to muck up the envelopes even more.


Do you remember Miss Poodle's amazing sewn-on address labels?  Well, I loved the look and I knew they'd be perfect, but I was far too lazy to disassemble our envelopes and actually sew them on.  The solution?  I printed each label, cut them out, sewed a border around each one, and used spray adhesive to glue them to the envelope.  Half the work, and I think they turned out pretty nicely!

Of course I had to make the labels wrap around!  Our return address folds around the back of the envelope.

Up next: We open them up and look inside!

p.s. do you notice I didn't make envelope liners?  I really, really wanted to.  I had them all planned out, but I ran out of time and energy.  My dad kept adding more invitees, and by the end of it all I was just relieved to have them finished.  So far I've only heard positive comments about them.  I'm sure no one will be expecting liners.  Oh well!

Invitation DIYers:  Was there an element you had to leave out of your invite suite?  Did anyone even notice it was missing?

March 31, 2010

Finished!

Some of you may have noticed that my last post was over two weeks ago.  I can't help but feel guilty for my absence, but I have a valid excuse!  My invitations have totally kicked my butt, but I am VERY happy to say that they're finished.  

Our living room looked like this for two weeks...

120 Cricut-cut and gocco printed sleeves, stitched address labels, fabric backed invites and double sided RSVP postcards later, I'm dooone.  

Details will come soon.  Until then:


Were your DIY invitations as much of a pain-in-the-butt as mine?

March 12, 2010

Wedding Balloons?

The other day I emailed Mr. Doxie and casually mentioned that it might look nice to use balloons as ceremony decoration.  He couldn't picture what I was talking about, so I responded with this this photo so that he could get a feel for what I was imagining:


"Wut?" was his only response.

I laughed, and then sent him genuine inspiration photos.  No offense, Two Ladies and a Helium Tank, but the balloon arch and pillars aren't really our style.  Those large, perfectly round balloons, however?  I think they're incredibly modern and beautiful if done correctly.  Do you remember this spread from MS Weddings a few months back?  


I love them; they're like a fresh take on paper lanterns.

I've been fretting a bit over our ceremony decoration.  Our ceremony is going to be outdoors, in a large, open grassy area.  Our venue offers a traditional white metal archy thing, but I dunno.  I didn't want an arch decorated with flowers.  It was a little dated to me, and I wasn't sure it would feel cohesive with the rest of our details.

Then, I saw this wedding featured at Green Wedding Shoes.  It pretty much solidified my desire for balloons-as-ceremony-decor.

And think of the pictures we'll be able to take after the ceremony!

I found these pictures late one afternoon while I was still at work, and I sketched out how I think I'd like the balloons set up.


I thought the balloons would make a pretty backdrop for the wedding party.  In my head, I imagined them to be red and a pretty, pale aqua.

I found these, and quickly ordered them to see if I liked the colors in person.  

Weellll, I liked the red.  The blue wasn't aqua, but teal.  Like Cupcake's teal.  Sooo, I didn't know what to do.  Should I go with red and white?

I drew up a few "mock-ups."


I'm not sure what we're going to do.  The balloons are affordable at ~$2.75 a piece, and the shipping was very fast.  

Which do you think would look better?  Would you ever use balloons as part of your wedding decor?

March 10, 2010

Haarblume

My favorite part about Germanic languages is the ability to squish as many nouns as possible into one megaword.  Donaudampfschiffahrtselektrizitätenhauptbetriebswerkbauunterbeamtengesellschaft translates to "Association for subordinate officials of the head office management of the Danube steamboat electrical services."  Wut?  My favorite was always "Geschirrspülmaschine," meaning dishwasher.  Isn't it fun to say?  My stepdad's favorite joke to tell, (and he tells it often), is:  How do you say 'bra' in German?  Itkeepsemfromfloppen.  Get it?

Um, but I digress.  The point of this post is to talk about something with which I'm sure most of you are familiar:  Hair flowers.  Or fascinators, as they are one-in-the-same.  I think.  According to Wikipedia, fascinators have only recently come back into style.  Maybe Carrie Bradshaw had something to do with the come-back?  

Anyway, I never thought I was going to embrace the wedding flower/fascinator trend.  I don't know if I thought it to be too "fashion forward?"  (lol?) or if it had anything to do with the fact that I know my mom would laugh at it, but I just never felt that I'd want to wear one, especially on a day where all eyes will be on me.  *gulp*

But, really, they're EVERYWHERE.  Come on, tell me you can't open a wedding magazine without flipping to a page that showcases a beautiful feathery flower affixed to the top of a fake bride's head.  By fake bride, I mean model.  Everything looks pretty on models...

Even so, I was intrigued.  I had seen so many pretty hair flowers that I started to imagine myself wearing one with my veil.  I even added a cute little flower to the picture I drew of myself for the banner on my personal blog. 
See?

I decided I'd go ahead and make one.  If I don't like it, I don't have to wear it amirite?  I turned to woman whom everyone turns to should they need a DIY tutorial, Martha.  I remembered that she had a fabric and paper flower feature a few months back.  I know a few of the Bees have already blogged about their fabric flowers, but I figured I'd join in the fun.  Just because I really like how mine turned out!

I'm not going to write a complete tutorial.  They're very simple and all the instructions can be found at marthastewartweddings.com.  

I chose to use the garden rose template, which calls for you to cut out many flower-shaped layers and stack them all together.  I went to JoAnn last week and used a 50% off coupon on a yard of red silk dupioni fabric.  It had just the right amount of sheen and structure.  The only downside is that it frays very easily.  

The first flower I made used the medium sized template.  

I layered all my layers up, pinned each petal through the entire stack of fabric and cut them all at once.  Martha doesn't tell you to do this, but she's probably not as lazy as I am.  This saved a ton of time.  

Mr. Doxie resized these pictures for me, and the quality got a little bit wonky.  Sorry.


It took about five minutes to cut all the layers out.  Make sure your scissors are sharp!  I separated all the layers, then stacked them back up and sort of staggered them.  I didn't pay much attention to the template when cutting, and one side ended up with petals much smaller than the other.  I made sure to put each layer opposite of the last, so that my finished flower would be even.

Assembling the flower is really as easy as folding the circle in half, tacking it with a few stitches, then folding it in half again, and sewing the seam shut with a few stitches. 
It took about three minutes with a needle and thread before my flower was finished.  It was oookay.  A little small, a little boring.

I don't want a huge take-over-your-head sort of flower, but something a little bit larger than that.  It was probably about three inches across.  Cute, though.  Maybe I'll gift those to the bridesmaids for their hair.

I tried again, this time using the large template, and adding more layers.  I want to say the first flower was nine layers of fabric?  I didn't count, but that sounds about right.

Attempt #2 had 17 layers of silk.  I also purchased some red tulle* because I thought it might give it a little more dimension.

My camera battery died before I could get a picture of the finished product on its own, but Mr. Doxie did snap a few shots of it in my hair!

I apologize for my messy hair, guys.  

My cheap little camera really doesn't do it any justice, but I think the flower looks great.  The silk is so pretty; it really makes it look like it was expensive.  But!  With my 50% coupon, it only cost about $3.00 to make.  

Now I have to make the veil to attach it to!  My mom hasn't seen it yet, and I'm pretty sure she's going to scoff, but I don't care.  It's very pretty, and it's going to look great with my dress.

Did  you end up wearing or using something that you never though you would?

*When I went to check out at JoAnn's, the kid who rang me up told me that my "tulley" didn't qualify for my coupon because it was already on sale.  Really?  How do you work at a fabric store and pronounce it "tulley?"

March 2, 2010

THE ONE.

No, I don't mean Mr. Dachshund.  Though he certainly is the guy for me, I'm not talking about that "One".  This "One" is The One that I never thought I'd find!  The One that took my breath away, that I had to have.  This One is my dress.
While I personally wouldn't mind Mr. D seeing the dress before the wedding, he's pretty adamant about keeping it secret.  So, if by chance you're reading, don't go any further!